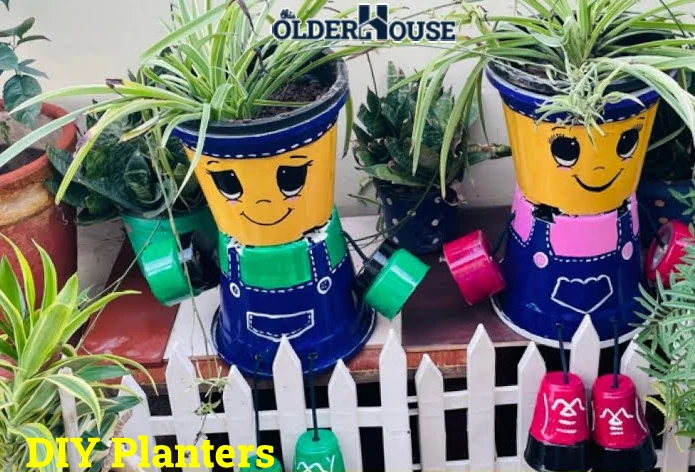
Imagine transforming your cramped apartment or tiny backyard into a lush, vibrant oasis brimming with thriving plants and fresh herbs. With a bit of creativity and some simple DIY skills, you can craft stunning planters tailored to even the most compact living spaces. Prepare to unleash your inner green thumb and breathe new life into your surroundings!
In this comprehensive guide, we’ll explore a variety of ingenious DIY planter projects perfect for small spaces. From repurposing everyday materials to constructing vertical gardens and space-saving raised beds, you’ll discover practical and budget-friendly solutions to maximize your green footprint. Get ready to roll up your sleeves and embark on a journey of transforming your living space into a verdant sanctuary.
DIY Planters: 10 Creative Ideas for Small Spaces
A. Importance of plants in small spaces
In the hustle and bustle of modern life, it’s easy to feel disconnected from nature, especially when confined to compact living quarters. However, introducing plants into your home or outdoor area can have a profound impact on your well-being. Not only do they purify the air and enhance your surroundings with natural beauty, but they also promote relaxation and a sense of calm. Regardless of the size of your space, incorporating greenery can create a serene oasis that rejuvenates your mind, body, and soul.
B. Benefits of DIY planters
While store-bought planters can be convenient, crafting your own offers numerous advantages. DIY projects allow you to exercise your creativity, customize designs to suit your specific needs, and often save money in the process. Moreover, the satisfaction of nurturing plants in a container you’ve built with your own hands is truly unmatched.
C. Overview of the article
In this article, we’ll guide you through a variety of DIY planter projects, ranging from simple and budget-friendly options to more intricate and space-saving designs. Each project will include detailed instructions, materials needed, and tips to help you overcome potential challenges. Whether you’re a seasoned DIY enthusiast or a complete beginner, you’ll find inspiration and practical guidance to bring your green dreams to life.
Wooden Pallet Planters
A. Materials needed
- Wooden pallets
- Potting soil
- Plants or seedlings of your choice
- Landscaping fabric (optional)
- Sandpaper or power sander
- Wood stain or paint (optional)
B. Construction process
- Disassemble the wooden pallets, separating the slats from the top and bottom boards.
- Arrange the slats into the desired planter shape, such as a rectangular or square box.
- Secure the slats together using nails, screws, or wood glue.
- (Optional) Sand the planter to smooth out any rough edges and prepare it for staining or painting.
- Line the planter with landscaping fabric to prevent soil from leaking through the cracks.
- Fill the planter with high-quality potting soil, leaving enough space for your plants to grow.
- Carefully transplant your plants or sow seeds directly into the soil.
- Water your new wooden pallet planter, and enjoy your handiwork!
C. Benefits and drawbacks
Benefits:
- Inexpensive and eco-friendly, as you’re repurposing materials that would otherwise be discarded.
- Highly customizable in terms of size, shape, and design.
- Rustic and charming appearance, adding character to your living space.
Drawbacks:
- Wooden pallets may require thorough cleaning and sanding to remove any potential contaminants or rough surfaces.
- Untreated wood can rot or deteriorate over time, especially when exposed to moisture.
D. Tips for making it more durable
- Apply a water-resistant sealant or stain to the wood to protect it from the elements.
- Consider lining the bottom of the planter with a removable plastic tray to catch excess water and prevent rotting.
- Use galvanized or stainless steel screws or nails for better corrosion resistance.
III. Concrete Pavers Raised Bed
A. Materials needed
- Concrete pavers or bricks
- Landscaping fabric
- High-quality potting soil
- Plants or seedlings of your choice
- Gravel or crushed stone (optional)
B. Construction process
- Choose a level area in your outdoor space for the raised bed.
- Lay down landscaping fabric to suppress weed growth.
- Arrange the concrete pavers or bricks in the desired shape and size for your raised bed, leaving no gaps between them.
- (Optional) Add a layer of gravel or crushed stone at the bottom for improved drainage.
- Fill the raised bed with high-quality potting soil, leaving enough space for your plants to grow.
- Carefully transplant your plants or sow seeds directly into the soil.
- Water your new concrete paver raised bed, and watch your plants flourish!
C. Benefits and drawbacks
Benefits:
- Durable and long-lasting, as concrete pavers are weather-resistant and won’t rot or deteriorate.
- Provides excellent drainage, preventing waterlogged soil and root rot.
- Elevates your plants, making gardening more accessible and reducing back strain.
Drawbacks:
- Can be heavy and labor-intensive to construct, especially for larger raised beds.
- Limited customization options in terms of shape and design.
- Concrete pavers can be expensive, depending on the quantity needed.
D. Tips for making it more functional
- Incorporate a drip irrigation system or install a water reservoir at the bottom for more efficient watering.
- Use pavers with textured or decorative surfaces to add visual interest to your raised bed.
- Place the raised bed in a sunny location, ensuring your plants receive ample light.
IV. No-Nails Raised Plant Bed
A. Materials needed
- Untreated cedar or redwood boards (or other rot-resistant wood)
- Landscaping fabric
- High-quality potting soil
- Plants or seedlings of your choice
- Wood screws or decking screws
B. Construction process
- Measure and cut the boards to the desired length for your raised bed.
- Arrange the boards in the desired shape and size, ensuring a tight fit without gaps.
- Secure the boards together using wood screws or decking screws, drilling pilot holes to prevent splitting.
- Line the bottom of the raised bed with landscaping fabric to suppress weed growth.
- Fill the raised bed with high-quality potting soil, leaving enough space for your plants to grow.
- Carefully transplant your plants or sow seeds directly into the soil.
- Water your new no-nails raised plant bed, and enjoy your low-maintenance garden!
C. Benefits and drawbacks
Benefits:
- Easy to assemble and disassemble, making it a versatile and portable option.
- Rot-resistant wood ensures durability and longevity.
- Provides excellent drainage and aeration for your plants.
Drawbacks:
- Limited in height compared to traditional raised beds, which may not be suitable for all plants.
- Wood can eventually deteriorate and may need to be replaced over time.
D. Tips for making it more efficient
- Use cedar or redwood boards, which are naturally resistant to rot, insects, and moisture.
- Incorporate a drip irrigation system or install a water reservoir at the bottom for more efficient watering.
- Mulch the soil surface to retain moisture and suppress weed growth.
V. Vertical Planters
A. Materials needed
- Wooden pallets or sturdy lattice
- Potting soil
- Plants or seedlings suitable for vertical gardening (e.g., trailing plants, herbs, small vegetables)
- Landscaping fabric (optional)
- Mounting hardware (screws, brackets, or hooks)
B. Construction process
- Disassemble the wooden pallets or prepare the lattice by cutting it to the desired size.
- (Optional) Line the back of the planter with landscaping fabric to prevent soil from falling out.
- Attach the pallets or lattice to a wall or fence using mounting hardware, ensuring it’s secured and level.
- Fill the planter with high-quality potting soil, leaving enough space for your plants to grow.
- Carefully transplant your plants or sow seeds directly into the soil, spacing them out evenly.
- Water your new vertical planter, and watch your plants cascade beautifully down the structure!
C. Benefits and drawbacks
Benefits:
- Maximizes vertical space, perfect for small gardens or balconies.
- Creates a visually striking and unique display of plants.
- Allows for easy access and maintenance of plants at different heights.
Drawbacks:
- Requires a sturdy wall or structure for mounting.
- Can be challenging to water plants evenly, especially at the top.
- May require additional support or trellising for larger or heavier plants.
D. Tips for making it more space-saving
- Use a narrow wooden pallet or lattice to create a slim vertical planter that hugs the wall.
- Choose compact, trailing plants or vines that can cascade down the structure.
- Incorporate a drip irrigation system or a self-watering reservoir to ensure even watering.
VI. Hanging Planters
A. Materials needed
- Hanging baskets or containers with drainage holes
- Potting soil
- Plants or seedlings suitable for hanging baskets (e.g., trailing plants, ferns, small flowering plants)
- Chains, ropes, or hooks for hanging
B. Construction process
- Choose suitable hanging baskets or containers with drainage holes.
- Fill the baskets or containers with high-quality potting soil, leaving enough space for your plants to grow.
- Carefully transplant your plants or sow seeds directly into the soil, spacing them out evenly.
- Attach chains, ropes, or hooks to the baskets or containers for hanging.
- Hang your planters at desired heights, ensuring they receive adequate sunlight and water.
C. Benefits and drawbacks
Benefits:
- Maximizes vertical space by utilizing overhead areas.
- Adds a touch of greenery and visual interest at different levels.
- Allows for easy rotation or repositioning of plants to receive optimal sunlight.
Drawbacks:
- May require frequent watering, as hanging baskets tend to dry out faster.
- Can be challenging to access and maintain plants at higher levels.
- Potential safety concerns if not properly secured or placed in high-traffic areas.
D. Tips for making it more secure
- Use sturdy chains, ropes, or hooks rated for the weight of the planter when fully grown and watered.
- Consider installing pulley systems or adjustable hanging mechanisms for easier access and maintenance.
- Choose lightweight yet durable containers to reduce the overall weight and potential safety risks.
VII. Window Box Planters
A. Materials needed
- Wooden boards or a pre-made window box
- Potting soil
- Plants or seedlings suitable for window boxes (e.g., herbs, small flowering plants, succulents)
- Mounting brackets or hardware (if attaching to a window)
- Wood stain or paint (optional)
B. Construction process
- Measure the windowsill or area where you plan to place the window box.
- Cut wooden boards to the desired length and assemble them into a box shape, or use a pre-made window box.
- (Optional) Sand and stain or paint the window box for aesthetic appeal.
- Drill drainage holes in the bottom of the box, if not already present.
- Fill the window box with high-quality potting soil, leaving enough space for your plants to grow.
- Carefully transplant your plants or sow seeds directly into the soil, spacing them out evenly.
- (If mounting) Secure the window box to the windowsill using mounting brackets or hardware.
- Water your new window box planter, and enjoy the burst of color and greenery!
C. Benefits and drawbacks
Benefits:
- Adds a charming and welcoming touch to your home’s exterior or indoor space.
- Allows you to grow plants in areas with limited ground space.
- Provides easy access for watering and maintenance.
Drawbacks:
- Limited depth and soil volume may restrict the types of plants you can grow.
- Requires drainage holes to prevent waterlogged soil and root rot.
- Mounted window boxes may require additional support or reinforcement.
D. Tips for making it more attractive
- Choose a variety of complementary plants with different textures, colors, and growth habits for visual interest.
- Incorporate trailing plants to create a cascading effect over the sides of the window box.
- Add decorative accents, such as small statues, garden ornaments, or colorful rocks, to enhance the aesthetic appeal.
VIII. DIY Greenhouse
A. Materials needed
- PVC pipes or wooden frames
- Clear plastic sheeting or greenhouse panels
- Potting soil
- Plants or seedlings suitable for greenhouse growing
- Ventilation system (e.g., small fans, vents, or windows)
B. Construction process
- Plan the size and layout of your DIY greenhouse based on available space and desired capacity.
- Construct a sturdy frame using PVC pipes or wooden beams, ensuring proper support and stability.
- Cover the frame with clear plastic sheeting or greenhouse panels, securing them tightly to the frame.
- Install a ventilation system, such as small fans, vents, or windows, to regulate temperature and humidity.
- Set up shelves, potting benches, or raised beds inside the greenhouse for your plants.
- Fill the growing areas with high-quality potting soil, leaving enough space for your plants to grow.
- Carefully transplant your plants or sow seeds directly into the soil.
- Monitor and adjust the greenhouse conditions as needed to ensure optimal plant growth.
C. Benefits and drawbacks
Benefits:
- Extends the growing season by providing a controlled environment for plants.
- Allows you to cultivate plants that may not thrive in your local climate.
- Protects plants from harsh weather conditions and pests.
Drawbacks:
- Requires proper ventilation and temperature control to prevent overheating or excessive humidity.
- Can be costly to construct, depending on the materials used.
- Maintenance and monitoring are necessary to ensure optimal growing conditions.
D. Tips for making it more functional
- Install an automated watering system or drip irrigation to simplify plant care.
- Use clear polycarbonate panels or double-walled plastic sheeting for better insulation and durability.
- Position the greenhouse in a sunny location, facing south for maximum sunlight exposure.
IX. DIY Tiered Planters
A. Materials needed
- Wooden boards or crates
- Potting soil
- Plants or seedlings suitable for tiered planters (e.g., herbs, small vegetables, succulents)
- Wood stain or paint (optional)
- Casters or wheels (optional)
B. Construction process
- Measure and cut wooden boards or repurpose wooden crates to create the desired number of tiers.
- Assemble the tiers by securing the boards or crates together, ensuring proper support and stability.
- (Optional) Sand and stain or paint the tiered planter for aesthetic appeal.
- Drill drainage holes in the bottom of each tier, if not already present.
- Fill each tier with high-quality potting soil, leaving enough space for your plants to grow.
- Carefully transplant your plants or sow seeds directly into the soil, spacing them out evenly.
- (Optional) Add casters or wheels to the bottom tier for easy mobility and portability.
C. Benefits and drawbacks
Benefits:
- Maximizes vertical space by stacking multiple growing levels.
- Allows for efficient use of limited ground space.
- Provides easy access for watering and maintenance at different heights.
Drawbacks:
- May require a sturdy base or support system to prevent toppling.
- Limited soil depth in each tier may restrict the types of plants you can grow.
- Requires adequate drainage to prevent waterlogged soil and root rot.
D. Tips for making it more attractive
- Alternate different colors or textures of wood for each tier to create visual interest.
- Incorporate decorative elements, such as painted designs or mosaic tiles, on the sides of the tiered planter.
- Arrange plants with contrasting foliage colors, textures, and growth habits for a visually appealing display.
X. DIY Planters from Recycled Materials
A. Materials needed
- Recycled materials (e.g., plastic bottles, tin cans, wooden crates, old tires)
- Potting soil
- Plants or seedlings suitable for the chosen recycled containers
- Decorative elements (e.g., paint, markers, wrapping paper)
B. Construction process
- (Optional) Decorate the recycled containers using paint, markers, wrapping paper, or other creative materials to give them a unique and personalized look.
- Fill the containers with high-quality potting soil, leaving enough space for your plants to grow.
- Carefully transplant your plants or sow seeds directly into the soil, taking into account the size and depth of each container.
- Water your new recycled planters, and enjoy the satisfaction of giving discarded materials a new life!
C. Benefits and drawbacks
Benefits:
- Eco-friendly and cost-effective, as you’re repurposing materials that would otherwise end up in landfills.
- Allows for creative expression and personalization of your planters.
- Promotes sustainability and raises awareness about reducing waste.
Drawbacks:
- Some recycled materials may not be as durable or long-lasting as purpose-built planters.
- Limited drainage or soil depth in certain containers may restrict plant growth.
- Requires extra care when using containers that were previously used for storing chemicals or hazardous materials.
D. Tips for making it more eco-friendly
- Choose recycled materials that are sturdy, non-toxic, and suitable for plant growth.
- Use natural or eco-friendly decorative elements, such as plant-based dyes or recycled paper.
- Incorporate composting techniques to enrich the soil with organic matter and reduce waste.
XI. Conclusion
A. Summary of the article
In this comprehensive guide, we’ve explored a diverse range of DIY planter projects, each offering unique solutions for bringing greenery into even the smallest of living spaces. From repurposing wooden pallets and concrete pavers to crafting vertical gardens and hanging planters, these projects cater to various skill levels, budgets, and space constraints.
B. Final thoughts on DIY planters for small spaces
Embracing DIY planters not only allows you to exercise your creativity but also encourages a more sustainable and eco-friendly lifestyle. By repurposing materials and exploring innovative gardening techniques, you can transform your compact living quarters into a verdant oasis that nourishes your mind, body, and soul.
C. Call-to-action for readers to try these ideas
So, what are you waiting for? Gather your materials, roll up your sleeves, and embark on a journey of bringing nature closer to home. Whether you choose to construct a vertical garden, craft a hanging planter, or repurpose recycled materials, the satisfaction of nurturing your plants in a handmade container is truly unmatched. Embrace the joy of gardening, no matter how small your space may be, and let your green thumb flourish!


