

Granite steps are strong and built to handle years of foot traffic, weather, and changing temperatures. But even durable stone steps can develop problems when water gets behind the tread. Moisture can weaken the mortar underneath, and freezing temperatures can cause the tread to shift or move forward.
The good news is that a damaged granite step does not always need to be completely replaced. If the granite tread is still in good condition, you can often repair the mortar bed, reset loose bricks, and reinstall the tread with the correct pitch so water drains away from the house.
Key Takeaway
Repairing granite steps starts with finding the cause of the damage rather than simply putting the tread back in place. Remove the damaged mortar, repair any loose or damaged masonry, install a fresh mortar bed, apply a thin Portland cement bonding coat to the granite, and reset the tread with a slight forward pitch. The front of the tread should sit slightly lower than the back so rainwater can run down the steps instead of collecting behind them.
Why Granite Steps Get Damaged
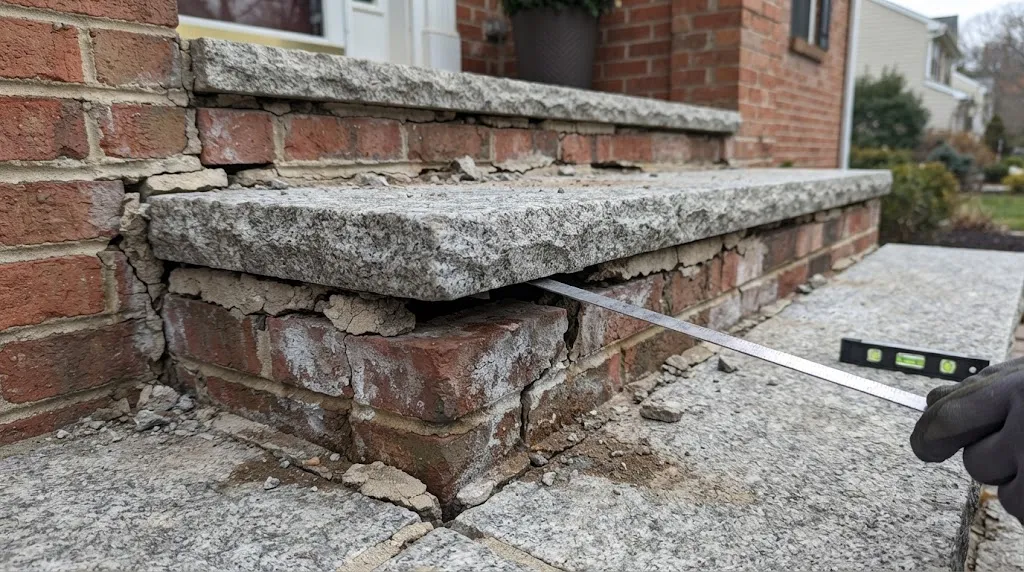
Water is one of the most common causes of masonry damage around exterior steps. When water gets behind a granite stair tread, it can remain trapped in the mortar bed.
During freezing weather, that moisture expands. The pressure can push the granite tread forward and damage the surrounding mortar. Over time, the mortar may become loose, soft, or crumbly.
This means replacing only the visible damaged mortar may not solve the problem. The underlying cause—poor drainage or an incorrect tread pitch—also needs attention.
Signs Your Granite Steps Need Repair
Look closely at your steps if you notice any of these problems:
- The granite tread has moved forward.
- Mortar underneath the tread is crumbling.
- Water appears to collect near the back of the tread.
- Bricks around the tread are loose.
- Mortar joints are cracked or deteriorated.
- The tread no longer slopes slightly toward the front.
- The step moves when you put weight on it.
A clean tread face can actually be a good sign because it may indicate that water is flowing in the correct direction. If water is instead running backward or collecting behind the tread, it can eventually damage the mortar underneath.
Tools and Materials You Need
Before starting the repair, gather the tools and materials you will need.
Materials
- Type N premixed mortar
- Portland cement
- Clean water
- Mixing tub
- Sponge
Tools
- Brick trowel
- Tuckpointing trowel
- Masonry chisel
- Brick hammer
- Slicking trowel
- Convex jointer
- Masonry brush
- Grinder
- HEPA vacuum attachment
- Rubber mallet
- Level
- Bucket
- Safety glasses
- Ear protection
A grinder can help remove stubborn mortar, but it should be used carefully. Wear appropriate eye and hearing protection and use dust control when grinding masonry.
How to Repair Granite Steps Step by Step
1. Remove the Granite Tread
Start by carefully removing the granite tread from the damaged step. Once it is removed, inspect the area underneath.
Look for deteriorated mortar, loose bricks, cracks, and areas where moisture has caused the masonry to break down.
Do not simply cover damaged mortar with new material. The loose and deteriorated material needs to be removed first.
2. Inspect the Mortar Bed
Healthy mortar should be hard and relatively solid. Moisture-damaged mortar may crumble easily or break down into powder.
Continue removing damaged material until you reach solid, intact mortar.
This step is important because new mortar needs a sound surface to bond properly. Leaving soft material underneath the repair can lead to another failure.
3. Remove Loose Mortar From the Joints
Use a masonry chisel to remove loose mortar from the surrounding joints.
Aim to expose roughly ¾ inch of depth where the joints need to be repointed. Mortar bonds better to clean masonry than to old, loose mortar.
For stubborn areas, a grinder with a HEPA vacuum attachment can make removal easier while helping control dust.
If the working area is small, a hammer and masonry chisel may be a better option than a grinder.
4. Check the Bricks
Inspect the individual bricks around the stair tread.
If a brick is loose or damaged, remove it. Do not leave a loose brick underneath a new tread because movement in the masonry can eventually affect the repaired step.
Clean away loose debris before installing replacement bricks.
5. Mix the Mortar
Place the Type N mortar mix into a mixing tub and add the recommended amount of water.
Mix it until the mortar reaches a thick, workable consistency similar to peanut butter.
Avoid adding excessive water. Mortar that is too wet can be difficult to work with and may not perform properly after curing.
6. Repoint the Damaged Joints
Load mortar onto a brick or margin trowel and push it firmly into the prepared joints using a tuckpointing trowel.
Pack the mortar into the joint until it is filled.
Once the mortar is in place, shape the joint with a suitable jointer or slicking trowel.
The goal is to create a solid, finished joint that does not leave gaps where water can easily enter.
7. Clean Excess Mortar
Some mortar will usually remain on the face of the brick.
Use a masonry brush to remove loose mortar from the surface. You can then use a damp sponge to clean the remaining residue.
Keep the sponge on the brick surface and avoid disturbing the newly repaired mortar joint.
8. Replace Loose Bricks
If bricks were removed during the repair, prepare a fresh mortar bed for them.
Spread mortar where the brick will sit and apply a small amount to the brick’s head joint.
Place the brick into position and gently tap it with a rubber mallet or the butt of the trowel.
Use a level to make sure the replacement brick is properly positioned and flush with the surrounding masonry.
Continue replacing damaged or loose bricks as needed.
9. Prepare the New Mortar Bed
Once the surrounding masonry is repaired, apply a new mortar bed over the brick and masonry surface.
A bed around two inches thick may be used for this type of repair, depending on the existing construction and the amount of material removed.
Use a brick trowel to furrow the mortar. Creating a wavy pattern gives the granite tread additional surface contact with the mortar.
10. Prepare the Portland Cement Bonding Coat
The granite tread needs a bonding layer before it is placed back onto the mortar.
Mix Portland cement with water in a bucket to create a thin slurry.
Using a brush, apply a thin coating to the underside of the granite tread.
Cover the surface thoroughly, including the small areas and uneven sections on the bottom of the stone.
The coating does not need to be thick. The purpose is to provide a bonding layer between the granite and the mortar bed.
11. Reset the Granite Tread
Carefully place the granite tread onto the fresh mortar bed.
Move it gently back and forth to help embed it into the mortar.
Check that the tread is centered on the stairs and properly supported across its surface.
This is also the point where you need to establish the correct pitch.
12. Set the Correct Pitch
The granite tread should not be perfectly flat from front to back.
It should have a slight forward pitch, with the front edge lower than the back edge.
Use a level to check the slope. A slight pitch—around ¼ bubble from back to front—is used in the repair process so water can drain toward the front of the step.
Correct pitch is one of the most important parts of the repair because it helps prevent water from collecting behind the tread.
Why the Tread Pitch Matters
A granite step can look perfectly level to the eye while still having a useful drainage slope.
If the tread slopes toward the house or stays flat enough for water to collect, moisture can work its way into the mortar bed.
When temperatures drop below freezing, trapped water can expand and place pressure on the masonry.
A small forward pitch allows rainwater to move away from the house and down the front of the step.
Pro Tip: Check the Drainage Before Repairing
Before beginning the repair, examine how water moves across the tread.
If the tread face stays relatively clean and water flows toward the front edge, the pitch may already be working correctly.
If water collects at the rear of the tread or appears to run backward, correct the pitch when resetting the granite.
Fixing the drainage issue is just as important as replacing the deteriorated mortar.
Pro Tip: Remove All Weak Mortar
Do not stop removing mortar as soon as the surface looks better.
Continue until you reach firm, intact material. Moisture-damaged mortar can become surprisingly weak and may crumble into dust.
New mortar will have a much better chance of lasting when it is applied to a clean and solid masonry surface.
Pro Tip: Clean the Surface Before Repointing
Dust and loose particles can interfere with the bond between new mortar and masonry.
After removing the old mortar, brush and clean the joints before filling them.
A clean joint gives the new mortar a better surface to grip.
Common Mistakes to Avoid
Leaving Damaged Mortar in Place
Covering deteriorated mortar with a new layer may only hide the problem temporarily.
Remove weak material until you reach a solid base.
Installing the Tread Completely Flat
A flat tread can allow water to remain near the rear of the step.
Always check the front-to-back pitch before the mortar sets.
Using Too Much Water in the Mortar
Overly wet mortar can be difficult to control and may not produce the desired repair.
Follow the mixing instructions for the mortar product you are using.
Ignoring Loose Bricks
A damaged tread may not be the only problem. Loose bricks underneath or beside the tread can cause movement after the repair.
Inspect and reset loose masonry before reinstalling the granite.
Skipping the Bonding Coat
The thin Portland cement slurry helps create a bond between the granite and the mortar bed.
Apply it thoroughly to the underside of the tread before resetting the stone.
When Should You Hire a Professional?
Repairing a granite tread involves heavy stone, masonry work, and power tools. If the tread is extremely large or difficult to move safely, professional help may be the better choice.
You should also consider hiring a qualified mason if you find major structural damage, extensive cracking, unstable stairs, or significant movement in the foundation beneath the steps.
A professional can determine whether the problem is limited to the tread and mortar or whether the supporting structure also needs repair.
Frequently Asked Questions
Can a cracked granite step be repaired?
Minor problems around the mortar bed may be repairable without replacing the entire granite tread. However, severely cracked or structurally damaged granite may require replacement.
Why is water damaging my granite steps?
Water can enter the joints and mortar beneath the tread. If drainage is poor, moisture may remain trapped and contribute to mortar deterioration, especially during freezing weather.
Should granite steps be perfectly level?
Not necessarily. The tread should have a slight forward pitch so water can drain away from the house instead of collecting behind the step.
How deep should old mortar be removed?
For the masonry joints described in this repair method, about ¾ inch of deteriorated mortar is removed to expose a sound surface for the new mortar.
What type of mortar can be used?
The repair process uses Type N premixed mortar for the masonry work. Always make sure the mortar is appropriate for the existing masonry and the specific repair.
Can I repair granite steps myself?
A homeowner with masonry experience may be able to handle a small repair, but granite treads can be heavy and difficult to move safely. If the stone or supporting structure is unstable, hiring a professional mason is safer.
Final Thoughts
Repairing granite steps is more than simply replacing cracked mortar. The underlying cause of the damage needs to be addressed so the repair can last.
Start by removing the granite tread and inspecting the mortar and surrounding bricks. Remove deteriorated material, repair loose masonry, and install a fresh mortar bed. Apply a thin Portland cement bonding coat to the underside of the granite before resetting the tread.
Most importantly, check the tread’s pitch. The front should sit slightly lower than the back so rainwater can drain away from the step.
With a solid masonry base, proper bonding, and correct drainage, a damaged granite stair tread can be restored without replacing the entire step.