

Skill Level: 5 out of 5 (Hard — not a DIY project at full scale)
Cost: $10–$70 per square foot installed
Estimated Time: Three days with a professional crew
Standing water on your driveway after every storm is more than an annoyance. It’s a sign your surface isn’t doing its job. A permeable paver driveway fixes that problem while cutting your environmental footprint at the same time.
This guide walks you through what permeable pavers are, how they’re installed, what they cost, and how to keep one working for decades.
What Is a Permeable Paver Driveway?
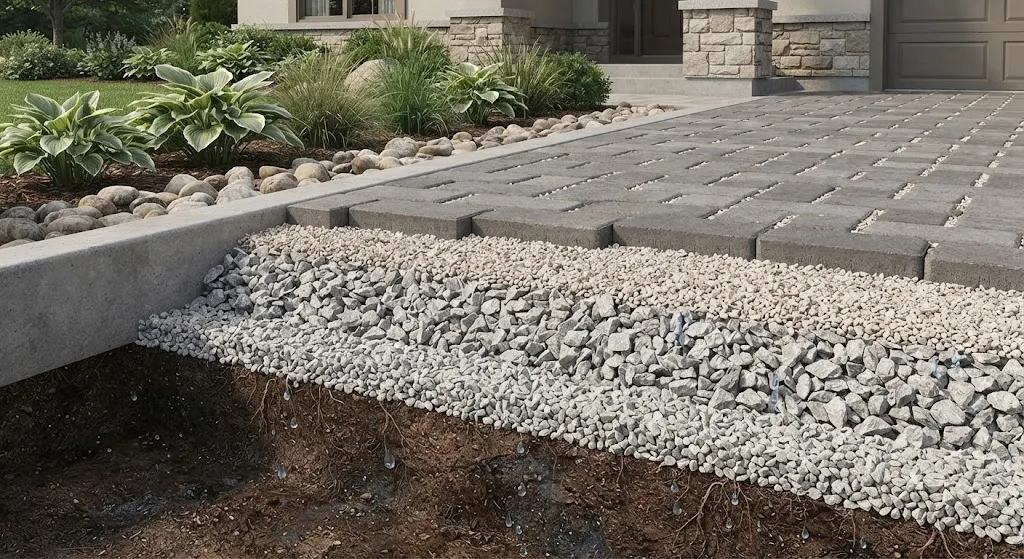
A permeable paver driveway is built from interlocking units made of concrete, brick, or natural stone. Unlike standard pavers, these units have wider joints or built-in gaps. Rainwater passes straight through them into a bed of crushed stone below, instead of running off the surface.
That crushed stone bed does the real work. Water filters down through it and into the soil, where natural processes strip out oil, sediment, and other pollutants before the water ever reaches a stream or storm drain. The result is cleaner groundwater, less strain on municipal sewer systems, and a lower risk of flooding on your property and your street.
Compare that to a standard asphalt or concrete driveway. Rain hits the surface, picks up oil and chemical residue, and rushes straight into the nearest storm drain. During heavy rain, that runoff overwhelms drainage systems and pollutes local waterways.
On the This Old House project in Brookline, landscape contractor Roger Cook saw this problem firsthand. The site’s old asphalt driveway sent rainwater straight downhill, causing erosion that carried sediment into nearby wetlands. The fix was a permeable system paired with underground storage tanks that collect water and release it slowly, filtering it in the process.
One driveway featured in this guide can absorb 10 inches of rain per hour. That’s roughly double the intensity of the heaviest 100-year storm recorded in the United States.
Is a Permeable Driveway Right for Your Home?
Permeable pavers aren’t a fit for every property. Before you commit, you need to understand your soil, your drainage needs, and your local permit requirements. Most homeowners hand these steps off to a contractor, but knowing what’s involved helps you ask the right questions.
Step 1: Test Your Soil’s Drainage Rate
A percolation test measures how fast water soaks into your soil. This tells your contractor whether the ground can handle stormwater on its own or whether you’ll need a deeper base or underground storage tanks to compensate.
Here’s how the test works. Dig a hole about 12 inches wide and 18 inches deep. Fill it with water and let the surrounding soil fully saturate. Then track how far the water level drops over time, measured in minutes per inch. That number is your percolation rate.
It’s the same basic test used to evaluate sites for septic systems. For a driveway, though, you’re checking whether the soil beneath your base layer can absorb runoff fast enough to prevent pooling.
For accurate results, bring in a civil engineer, geotechnical professional, or landscape architect with stormwater experience. They’ll also flag any local regulations that affect your design.
Pro tip: Roof runoff adds up fast. A 3,000-square-foot roof generates over 1,800 gallons of water during a single one-inch rainstorm. Factor your roof’s square footage and your area’s typical rainfall into your driveway’s capacity before you finalize a design.
Step 2: Calculate Your Materials
Measure your driveway area precisely. You’ll need this number to order the right amount of crushed stone for each base layer, plus the pavers themselves. Always order extra material to cover cuts, waste, and edge pieces — running short mid-project causes delays and drives up labor costs.
Step 3: Secure Your Permits
Check with your local building department before you break ground. Many municipalities have specific rules for permeable surfaces, separate from standard driveway regulations. Submit your permit applications early and wait for approval before construction starts.
Some towns require stormwater management infrastructure as a condition of the permit itself. In other words, don’t assume you can skip the underground drainage components to save money — your permit may depend on them.
Tools and Materials You’ll Need
Tools
- Excavator or skid steer (for larger projects)
- Plate compactor
- Wheelbarrow
- Shovels and rakes
- Level and string line
- Rubber mallet
- Concrete saw or paver splitter
- Push broom
Base Materials
- 3/4- to 2-inch washed crushed stone for the bottom layer
- 1/4- to 1-1/2-inch washed crushed stone for the middle layer
- 1/4-inch stone for the bedding layer and joint filling
How to Install a Permeable Paver Driveway: Step-by-Step
Full-scale permeable driveway installation calls for professional equipment and experience. Even if you’re hiring the work out, understanding each step helps you evaluate contractor bids and spot corners that shouldn’t be cut. Small-scale projects, like a garden path, are more realistic for an experienced DIYer.
Step 1: Mark and Excavate the Site
Call 811 before you dig, so underground utilities get marked and you avoid a costly, dangerous mistake. Once that’s done, outline your driveway boundaries with stakes and string. Make sure the layout meets your local setback requirements.
Remove the existing driveway surface and excavate to a minimum depth of 15 inches. Depending on your percolation test results, you may need to dig deeper or add extra drainage infrastructure below the base.
Step 2: Build the First Two Stone Layers
Start with a 6-inch layer of 3/4- to 2-inch washed crushed stone. This coarse stone forms a stable foundation and lets water move through freely. Spread it evenly across the excavated area.
Next, add a 4-inch layer of 1/4- to 1-1/2-inch washed crushed stone on top. Compact each layer separately with a plate compactor, making two passes in different directions — once across the driveway, once lengthwise. Skipping this step is one of the most common causes of settling and uneven surfaces down the road.
Step 3: Screed the Bedding Layer
The bedding layer creates a smooth, level surface for the pavers to sit on. Install concrete or hard-plastic edging first to hold the pavers in place once they’re set.
Lay two 2-inch steel pipes about 6 feet apart as screed guides. Cover the area between them with 1/4-inch stone, then drag a 2×4 across the pipes to level the surface. Remove the pipes, fill in the resulting grooves, and repeat this process across the rest of the driveway.
Step 4: Set the Pavers
Start at the lowest corner of the driveway. Place pavers tightly against the edging and against each other, following your chosen pattern. Many permeable paver units have small spacer nibs on their sides that automatically create the correct drainage gaps.
Check alignment every 6 to 10 feet to keep each row square. Lay all the full-size pavers first, then go back and cut pieces to fill the gaps along curves, edges, and obstacles. A concrete saw or paver splitter gives you the cleanest cuts.
Step 5: Fill the Joints
Spread 1/4-inch stone — the same material used in your bedding layer — over the finished surface. Use a wide push broom to sweep it into the joints between pavers. Work diagonally across the pattern so you don’t pull stones back out of joints you’ve already filled.
Step 6: Compact the Finished Surface
Sweep the surface clean, then run a plate compactor diagonally across the entire driveway. This settles the pavers firmly into the bedding layer and locks the whole system together. Make several passes for thorough compaction.
After compacting, check the joints again. Some will have settled and need a second round of stone and compaction. If you haven’t already added edging along the driveway’s perimeter, do it now — it keeps the outer row of pavers from shifting over time and gives the whole project a clean, finished look.
Maintaining Your Permeable Paver Driveway
A permeable driveway needs less upkeep than you might expect, but skipping maintenance entirely will eventually turn it into a clogged, standard driveway.
Clean It Once a Year
Sweep or vacuum the surface at least annually to keep leaves and debris from clogging the joints. A pressure washer on a low setting works for deeper cleaning, but go easy — you don’t want to blast the joint material out along with the dirt. Skip chemical cleaners, since they can compromise the driveway’s permeability and undo the environmental benefit you installed it for.
Stay Ahead of Weeds
Permeable pavers discourage weed growth compared to cracked asphalt, but joints can still sprout the occasional weed. Pull them by hand or use an environmentally friendly herbicide. Topping off joint material regularly also helps crowd weeds out.
Repair Damaged Pavers Individually
One advantage of a paver system over poured concrete or asphalt: you can repair a single damaged unit without touching the rest of the driveway. Remove the damaged paver and surrounding joint material, drop in a replacement, and refill the joints around it.
What Does a Permeable Paver Driveway Cost?
Permeable paver driveways typically run $10 to $40 per square foot, depending on your material choice. For an average driveway, that works out to roughly $4,800 to $19,200 total.
Several factors move that number up or down:
- Driveway size: Larger driveways mean higher material and labor costs.
- Paver material and quality: Natural stone and cobblestone cost more than concrete or grid-and-grass systems.
- Site complexity: Slopes, curves, and tight access points add labor time.
- Drainage needs: Poor soil percolation means you’ll need extra stone or underground storage, which raises your budget.
- Local labor rates: Installation costs vary by region based on demand and cost of living.
Long-Term Value
The upfront cost of a permeable driveway usually runs higher than asphalt or plain concrete. Over time, though, it can pay you back in several ways:
- Reduced need for separate stormwater management systems
- Lower long-term maintenance costs compared to repairing cracked asphalt
- A potential bump in property value
- Possible savings on municipal stormwater fees, depending on where you live
Should You DIY or Hire a Professional?
A permeable driveway is a poor candidate for a weekend DIY project. The equipment is specialized, the base preparation has to be precise, and mistakes are expensive to fix after the fact. Improper grading or compaction can lead to standing water, paver shifting, or a driveway that fails within a few years instead of lasting decades.
Hiring a contractor with specific permeable paver experience costs more upfront, but it buys you correct base preparation, accurate drainage grading, and proper paver placement — the three things that determine whether your driveway performs the way it’s supposed to.
Common Problems and How to Fix Them
Poor Drainage or Standing Water
Standing water usually means clogged joints. Clean the surface thoroughly, and consider a vacuum designed specifically for permeable pavers to pull debris out of the joint material rather than just off the top.
Uneven Surfaces
Settling or improper base compaction can cause dips or high spots. For small areas, remove the affected pavers, adjust the bedding layer beneath them, and reset the pavers. Larger unevenness usually points to a base problem and calls for a professional assessment.
Shifting Pavers
Loose or shifting pavers almost always trace back to inadequate edging. Inspect your perimeter edging regularly and reinforce or replace it as needed to keep the outer rows locked in place.
Final Thoughts
A permeable paver driveway gives you a durable, attractive surface that also protects your property — and your neighborhood’s waterways — from stormwater damage. Because the system depends on soil that drains well, proper testing and planning up front matter more here than with a standard driveway.
Given the technical demands of base preparation and grading, this is a project worth handing to a specialist. Done right, a permeable paver driveway can last for decades with only minimal annual upkeep, while asphalt and concrete alternatives typically need resurfacing or replacement much sooner.
If you’re weighing your driveway options, permeable pavers offer a rare combination: real environmental benefit, strong durability, and long-term cost savings that offset the higher installation price. Understanding these installation steps and maintenance requirements now will help you avoid surprise repair costs later and get the most out of your investment.