

Hollow-core doors feel cheap. You hear every conversation through them. They dent if you bump them with a laundry basket. If you’ve ever knocked on one and heard that thin, tinny echo, you already know the problem.
Solid core doors fix that. They block sound better, resist damage, and give your home a heavier, higher-end feel every time you close one. Swapping your old doors for solid core ones is one of the most noticeable upgrades you can make to a house, and you don’t need to be a professional carpenter to do it.
This guide walks you through the entire process, from measuring your old door to hanging the new one. You’ll also learn why a slab swap often beats a full prehung door replacement, and what tools and materials you actually need.
What Is a Solid Core Door?
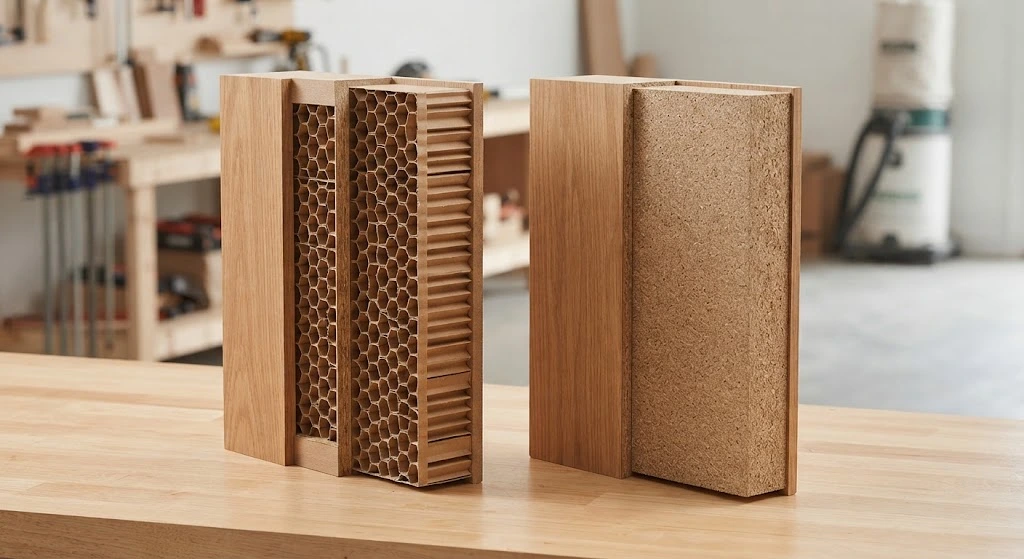
A hollow-core door is mostly empty space. Inside, you’ll find a honeycomb of cardboard or thin wood strips holding two veneer panels apart. It’s light, cheap, and offers almost no sound resistance.
A solid core door is built differently. Two structural wood strips run down each side of the door to hold the hinges and hardware securely. The space between them is filled with compressed wood particles and resin, creating a dense, heavy panel.
That density is what makes solid core doors better at three things:
- Soundproofing. Less sound passes through solid material than through a hollow shell.
- Fire safety. Solid core doors slow the spread of fire and smoke better than hollow doors.
- Durability. They resist dents, dings, and warping far longer than hollow-core alternatives.
Why Swap the Slab Instead of Installing a Prehung Door?
You have two options when upgrading a door: replace the entire prehung unit (door plus frame) or swap just the door slab and keep your existing frame.
A prehung replacement means removing the trim on both sides of the door, tearing out a jamb that’s often still in good shape, then installing, shimming, and painting a new one. That’s hours of extra labor for a job that doesn’t need it.
A slab swap skips all of that. As long as your existing jamb and trim are square and in good condition, you can transfer the new door onto your current hinges and hardware locations. It’s faster, cheaper, and creates far less mess.
Tools You’ll Need
- Tape measure
- Hammer
- Nail punch (for removing hinge pins)
- Circular saw
- Router with a template guide bit
- Hole saw kit
- Combination square
- Screw gun
- Pencil
- Eye protection
- Hearing protection
- HEPA vacuum (for cleanup)
- Sawhorses
Materials You’ll Need
- Solid core interior door (matched to your existing door’s height and width)
- Homemade door buck (built from 2×4 scraps to hold the door steady)
- Hinge jig
- Lockset jig
- Self-centering drill bit
- #2 Phillips screwdriver bit
- All-purpose primer
Step-by-Step: How to Install a Solid Core Door
1. Measure Your Existing Door
Grab your tape measure and record the width and height of your current door in inches. Carpenters usually describe doors in feet-and-inches shorthand. A 30-inch-wide door is called a “2/6.” An 80-inch-tall door is called a “6/8.” Use these measurements when you buy your new solid core door so the fit matches your existing frame.
2. Remove the Old Door
Use a hammer and nail punch to knock out the hinge pins. Place the punch under each pin and tap upward until it slides free. You’ll need to remove all three pins, so keep them together in one spot; you’ll reuse them later.
Once the pins are out, carefully lift the door away from the frame. With a screw gun, remove the lockset and the hinge leaves from the old door. Set the hardware aside; you’ll use the hinge positions as a template.
3. Transfer Your Layout to the New Door
Lay the new door flat across your sawhorses. Place the old door (now stripped of hardware) directly on top of it, aligning the edges.
Using a pencil and a combination square, trace the exact location of each hinge mortise and the lockset hole from the old door onto the new one. This step is what makes the whole project accurate. Skip it, and your new door won’t line up with your existing frame.
4. Set Up the Hinge Mortises
Place the new door in your homemade door buck with the hinge side facing up. Position the hinge jig over the marked locations and secure it with screws or its built-in clamps.
Put on your eye protection and hearing protection before you turn on the router. Using a template guide bit, rout each hinge mortise just deep enough that the hinge leaf sits flush with the door’s surface. Going too deep will leave a gap; not deep enough, and the door won’t close properly.
5. Bore the Lockset and Latch Holes
Line up the lockset jig with the marks you traced earlier. Using a hole saw bit in your drill, bore through the door until the pilot bit just pokes through the opposite face. Stop there, flip the door over, and finish the hole from the other side. This two-sided approach prevents splintering on the exit side of the door.
Next, bore the smaller hole for the latch on the door’s edge.
6. Rout the Latch Mortise
Position the latch mortise jig over the latch hole and rout it to the correct depth so the latch plate will sit flush with the door edge.
7. Install the Hinges
Set each hinge into its mortise. Using a self-centering drill bit, drill pilot holes through each screw hole in the hinge leaf, then drive the screws to secure the hinges to the door.
8. Hang the Door
With a helper, lift the door into position and align the hinge barrels with the hinges still mounted on the frame. Slide the hinge pins back in, starting with the bottom hinge and working your way up.
9. Install the Latch and Lockset
Slide the latch into its mortise and use the self-centering bit to drill pilot holes for the latch screws. Drive the screws in, then finish installing your lockset hardware.
10. Test and Finish
Open and close the door several times to check that it swings freely and latches properly. Once you’re satisfied, apply an all-purpose primer to any exposed edges before painting or finishing the door to match your trim.
Pro Tip: Get the Gap Right
A properly hung door should leave roughly the width of a nickel between the door and the jamb, which is just under 1/8 inch. This gap keeps the door from binding against the frame while still sealing well enough for good soundproofing. Measure and trim carefully before you hang the door. A gap that’s too wide undercuts your sound insulation, and a gap that’s too tight will cause the door to stick as the seasons change.
Common Mistakes to Avoid
- Skipping the trace step. Always mark hinge and lockset positions from your old door rather than measuring from scratch. It’s faster and far more accurate.
- Routing hinge mortises too deep. This leaves a visible gap between the hinge leaf and the door face.
- Forgetting to prime cut edges. Solid core doors absorb moisture at exposed edges if left unfinished, which can cause swelling over time.
- Rushing the hole-boring step. Boring straight through in one pass often splinters the wood on the exit side. Always drill halfway, flip, and finish from the other side.
How Much Does It Cost to Install a Solid Core Door?
Solid core interior doors typically run between $100 and $300 per slab, depending on size, wood species, and whether it’s pre-finished. Since a slab swap reuses your existing jamb, trim, and hardware, you avoid the added cost of a full prehung unit, which often runs $300 to $600 installed once you factor in labor.
Frequently Asked Questions
Can I install a solid core door myself?
Yes. With basic carpentry tools and a few hours, most homeowners can complete a slab swap without hiring a contractor. The key is precise measuring and careful use of the hinge and lockset jigs.
Do solid core doors really block more sound?
Yes. Their dense, filled core absorbs and blocks sound far better than the hollow, cardboard-filled interior of a standard interior door.
What’s the difference between solid core and solid wood doors?
Solid core doors have a composite core made of compressed wood particles and resin, wrapped in a veneer or wood-strip frame. Solid wood doors are made entirely from a single wood species. Solid core doors cost less and resist warping better, while solid wood doors offer a more premium look and feel.
Final Thoughts
Upgrading to solid core doors is one of the best return-on-effort projects you can take on in a weekend. You get better soundproofing, improved fire resistance, and a heavier, more solid feel every time you walk through a doorway. By reusing your existing jamb and trim through a simple slab swap, you skip the mess and expense of a full door replacement while still getting a like-new result.
Take your time on the measuring and marking steps. That’s where the whole project succeeds or fails. Once your hinges and lockset line up correctly, the rest of the installation moves quickly.