

To repair a laminate flooring scratch, clean the area first, then fill light scratches with a matching touch-up marker or wax crayon. For deep scratches, use color-matched putty or a wax filler stick, smooth it with a putty knife, and wipe away the excess before it hardens.
Laminate floors take a beating. Kids drag toys across them. Dogs skid around corners. Chairs scoot back and forth a hundred times a day. Sooner or later, scratches show up, and they can make even a brand-new floor look tired.
The good news is that fixing laminate flooring scratches is usually a quick job. You don’t need to hire a pro or replace the whole floor. With the right tools and a little patience, you can make most scratches disappear in an afternoon.
Why Laminate Floors Scratch So Easily
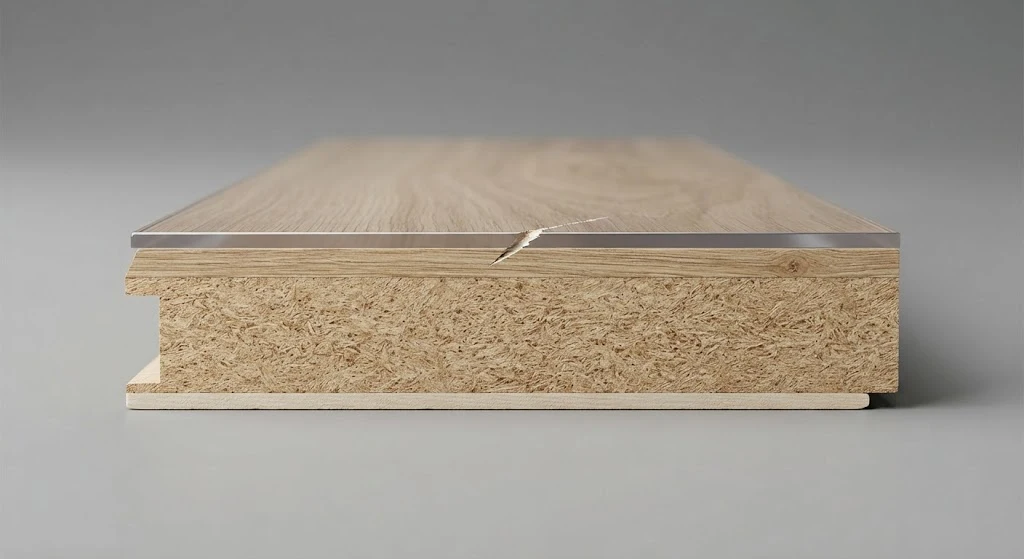
Laminate flooring looks like real wood, but it’s actually built from several layers pressed together. The top layer is a clear coating, often made from aluminum oxide, that protects the floor from everyday wear. Below that sits a printed layer that gives the plank its wood or stone pattern. Under both of those is a dense core board that holds everything together.
Scratches happen when something breaks through that top protective layer. Grit tracked in on shoes acts like sandpaper. Furniture legs without pads dig in when you push a chair back. Pet claws leave thin lines across high-traffic areas. Once that clear layer is scratched, the mark becomes visible because light hits it differently than the smooth surface around it.
Knowing this layered structure matters because it shapes how you repair the damage. Laminate can’t be sanded down and refinished the way solid hardwood can. Once you cut through that top layer, filling the gap is your only real option.
Check How Bad the Scratch Really Is
Before you grab any repair product, take a close look at the scratch. Run your fingernail across it. If you can’t feel a groove, you’re dealing with a light surface scratch. If your nail catches or dips into the mark, it’s gone deeper.
Light scratches usually mean the wear layer alone has been scuffed. Deep scratches cut through that layer and into the printed design underneath, sometimes exposing the lighter core material. This distinction matters a lot, because light scratches often need nothing more than a marker, while deep ones call for a filler.
Take a minute here. Rushing straight to sandpaper or a heavy-duty kit on a scratch that barely needs a touch-up marker can end up making things worse.
What You’ll Need Before You Start
Most laminate scratch repairs use inexpensive tools you can find at any home improvement store. A soft cloth and a pH-neutral floor cleaner handle the cleanup step. For light scratches, a touch-up marker, crayon, or pencil in a shade close to your floor color does the trick. For deeper damage, you’ll want color-matched putty or a wax filler stick, along with a plastic putty knife for spreading it.
Many flooring manufacturers sell repair kits designed specifically for their products. If you know the brand of your laminate, check their website first. A kit made for your exact floor will match the color far better than a generic one from the hardware store.
Before applying anything, test the product on a hidden spot, like inside a closet or under an appliance. Colors can look different once they dry, and you want to know how it reacts before you touch the visible parts of your floor.
How to Fix Light Scratches
Start by cleaning the scratched area thoroughly. Dust and grit left behind can interfere with how well the repair product sticks, so wipe the spot with a damp cloth and let it dry completely.
Once the area is clean and dry, use your touch-up marker or crayon. Color in the scratch with light, even strokes, following the direction of the wood grain if your floor has one. Add layers gradually rather than pressing hard and covering it all at once. The color builds up fast, and it’s easier to add more than to remove excess.
Wipe away any marker or wax that lands outside the scratch itself. A soft, dry cloth works well for this. Let the area sit for a few minutes so the product sets before anyone walks across it.
If you’d rather skip the store-bought products, a few household items can help with very light surface marks. A small dab of white, non-gel toothpaste rubbed gently into the scratch with a soft cloth can buff out faint lines. A paste made from baking soda and a few drops of water works in a similar way. Neither of these fixes deep damage, but they’re worth trying on faint scuffs before you buy anything.
How to Fix Deep Scratches and Gouges
Deep scratches need a filler, not just color. Start with the same cleaning step, making sure the groove is free of dust and debris. A vacuum with a soft brush attachment reaches into the scratch better than a cloth alone.
Take your color-matched putty and apply it with a plastic putty knife held at roughly a 45-degree angle. Work the putty into the scratch from both sides so it fills the full depth of the groove, not just the surface. Once it’s packed in, scrape the flat edge of the knife across the area to remove excess putty and level it with the surrounding floor.
Let the putty cure fully before walking on it or cleaning the floor again. Most products need a full day to harden completely, though drying times vary by brand, so check the label.
Wax filler sticks work in a similar way but need heat to apply. Many kits come with a small heating tool. You melt the wax, drip it into the scratch, and let it sit for a few seconds to cool before scraping away the excess with a plastic scraper or old gift card. Buff the area with a soft cloth once it’s set.
If the putty or wax color doesn’t blend perfectly once it dries, go over it lightly with a touch-up marker in a matching shade. This final step often makes the difference between a repair you can spot and one you can’t.
When Sanding Makes Sense (And When It Doesn’t)
You’ll sometimes see advice to sand out laminate scratches. This can work in very specific situations, but it’s risky. Because the printed design layer sits just below that clear protective coating, sanding too aggressively can wear through the pattern and expose the plain material underneath. That damage is permanent and far more noticeable than the original scratch.
If you do decide to sand, use a fine-grit sandpaper, work by hand rather than with a power sander, and stop as soon as the scratch fades. Wipe the area with a damp cloth afterward to clear away dust. For anything beyond very shallow, thin scratches, skip sanding and reach for putty or a marker instead.
Replacing a Damaged Plank
Sometimes a scratch or gouge is too severe to fill. Maybe something heavy was dropped, or a scratch runs the full length of a board. In these cases, replacing the individual plank often makes more sense than trying to hide the damage.
Laminate flooring installed with a click-lock system can usually be taken apart board by board, starting from the nearest wall or doorway, until you reach the damaged plank. Once it’s out, a new matching plank clicks back into place, and you reassemble the floor behind it. If your laminate was glued down, this process is more involved and may be worth handing off to a flooring professional.
Keeping a few spare planks from your original installation makes this kind of repair much easier down the road. Many homeowners store extras in a closet or garage specifically for this reason.
Preventing Future Scratches
Repairing a scratch is one thing. Keeping new ones from showing up is another. Felt pads under furniture legs stop chairs and tables from scoring the floor every time they move. A doormat at each entrance catches grit before it gets tracked across the room, since dirt and small stones are one of the most common causes of scratching.
Trimming pets’ nails regularly reduces the fine scratches that build up over time in homes with dogs or cats. When moving furniture or appliances, lift them instead of dragging them, even for short distances. And sweeping or vacuuming laminate floors often, rather than letting debris sit, goes a long way toward keeping the surface scratch-free.
Final Thoughts
Laminate floors are tough, but they’re not scratch-proof. The good news is that most scratches, even the deeper ones, can be repaired at home without special skills or expensive tools. Clean the area, match your filler or marker to the floor color, and take your time applying it. With a bit of care, your floor can look close to new again, and a few simple habits can help keep it that way for longer.