

Fill a plastic bag with white vinegar, tie it around your shower head so the nozzles stay submerged, and let it soak for 30 minutes to overnight. Remove the bag, scrub with an old toothbrush, and run hot water through the head for two minutes to flush out loosened mineral deposits.
Why Your Shower Head Needs Regular Cleaning
Every time water runs through your shower head, it leaves behind tiny traces of calcium and magnesium. Over weeks and months, these minerals build up inside the nozzles and block them one by one. You might not notice it happening, but you’ll notice the result. Your shower pressure drops, the spray pattern turns uneven, and some jets stop working altogether.
This buildup isn’t just annoying. It also creates a place for bacteria and mold to grow, especially in the small crevices around the nozzles. A dirty shower head can even spray these particles into the air along with your water. Cleaning it regularly keeps your water flow strong and your bathroom healthier.
Signs Your Shower Head Needs Cleaning
You don’t need a magnifying glass to know when it’s time to clean your shower head. The water pressure is usually the first clue. If your once-powerful spray now feels weak or the water dribbles out in a few thin streams, mineral deposits are likely clogging the holes.
Take a close look at the face of the shower head too. White or greenish crust around the nozzles is a clear sign of hard water buildup. Some spots may look chalky, while others feel gritty when you run your finger across them. If your shower head sprays water at odd angles instead of a straight, even pattern, that’s another sign the nozzles are partially blocked.
What You’ll Need Before You Start
Cleaning a shower head doesn’t require anything fancy. Distilled white vinegar works better than any store-bought cleaner because its acidity breaks down calcium deposits without damaging most finishes. You’ll also want a gallon-sized plastic bag, a rubber band or zip tie, an old toothbrush, and a toothpick or thin pin for poking out stubborn clogs.
If your shower head is removable, grab a wrench and an old cloth to protect the finish while you loosen it. A small bowl also works well if you’d rather soak the shower head directly instead of using a bag. Baking soda is optional, but it helps with grease and soap scum if your shower head has more than just mineral buildup.
How to Clean a Shower Head With Vinegar Without Removing It
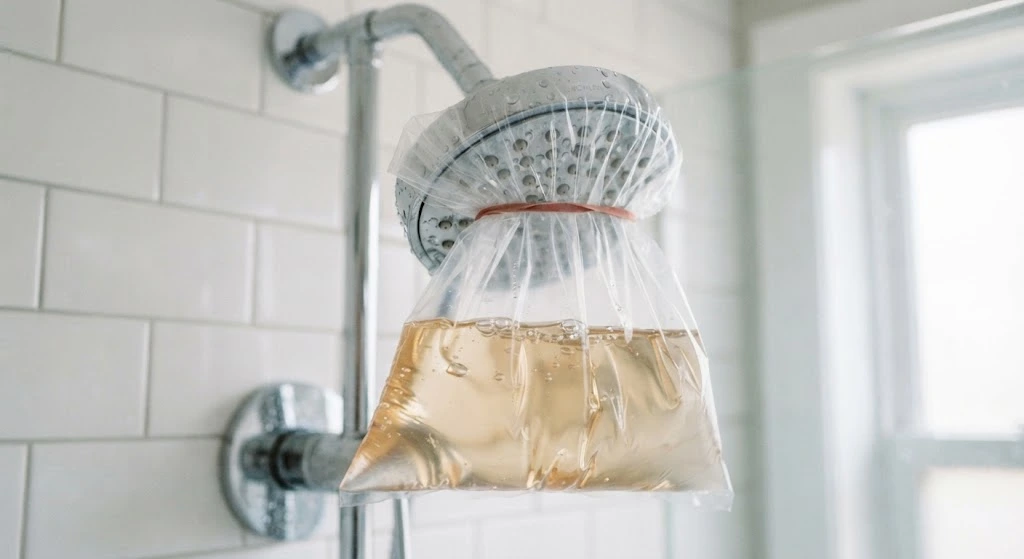
This method works great if you want quick results without any tools. Start by pouring distilled white vinegar into a plastic bag until it’s about half full. You want enough liquid to fully cover the face of the shower head once the bag is in place, but not so much that it spills everywhere.
Slide the bag up over the shower head so the nozzles sit completely underwater. Gather the open end of the bag around the shower arm and secure it tightly with a rubber band or zip tie. Make sure there are no gaps where the vinegar could leak out.
Let the bag hang there for at least 30 minutes. If your shower head hasn’t been cleaned in a long time, leave it overnight for the best results. When the soak is done, remove the bag and pour the leftover vinegar down the drain.
Turn on the hot water and let it run through the shower head for a minute or two. This flushes out any loosened mineral flakes still sitting inside the nozzles. If a few spots still look clogged, scrub them gently with an old toothbrush, then poke each nozzle with a toothpick to clear out anything stuck inside.
How to Deep Clean a Removable Shower Head
Sometimes a quick soak isn’t enough, especially if your home has hard water. In that case, take the extra step of removing the shower head entirely. Wrap the connecting nut with a cloth to protect the finish, then use a wrench to twist it loose. Once it’s free, you can unscrew the rest by hand.
Drop the shower head into a bowl filled with distilled white vinegar, making sure it’s fully submerged. Let it soak for at least an hour, though overnight works even better for heavy buildup. The longer soak gives the vinegar more time to dissolve the hardened mineral layers hiding inside the small passageways.
After soaking, scrub every part of the shower head with a toothbrush, paying close attention to the edges and the space around each nozzle. Rinse it thoroughly under running water to wash away any loosened debris and vinegar residue.
Before reattaching the shower head, wrap plumbing tape around the threaded end of the pipe. This helps prevent leaks once everything is back together. Screw the shower head back into place by hand, then use the wrench for a final quarter turn if needed. Run the hot water for a minute to flush out anything left behind.
Cleaning the Shower Head Filter Screen
Many people forget about the small filter screen tucked inside the base of the shower head, right where it connects to the pipe. This little mesh screen catches sediment before it reaches the nozzles, but it can get clogged over time too.
To reach it, remove the shower head the same way described above. Use tweezers or needle-nose pliers to carefully lift the filter screen out of its slot. Mix equal parts water and vinegar in a small cup, then soak the screen for about 15 minutes.
Scrub the screen gently with an old toothbrush to remove any trapped debris, then rinse it under running water. Once it’s clean, slide it back into place before reattaching the shower head. This small step often makes a noticeable difference in water pressure.
Using Baking Soda for Tougher Buildup
If vinegar alone doesn’t fully clear things up, baking soda can give your cleaning solution extra scrubbing power. Add a small amount of baking soda to your vinegar, using no more than one part baking soda for every two parts vinegar. Adding equal amounts of each will cause the two ingredients to cancel each other out, so keep the ratio in mind.
Use this mixture the same way you would plain vinegar, either soaking the shower head directly or securing a filled bag around it. The fizzing reaction helps loosen tougher deposits and soap residue that vinegar alone might struggle with. Rinse thoroughly afterward, since dried baking soda can leave a chalky residue if it isn’t washed away completely.
How Often Should You Clean Your Shower Head
The right cleaning schedule depends mostly on your water type. If you live in an area with hard water, plan to clean your shower head every month to keep mineral buildup from getting out of hand. Homes with softer water can usually stretch that out to once every two or three months without noticing a drop in pressure.
Pay attention to your shower head between cleanings too. If you start noticing weaker pressure or an uneven spray pattern earlier than expected, don’t wait for your next scheduled cleaning. A quick vinegar soak whenever you spot the early signs will keep the buildup from turning into a bigger job later.
Tips to Prevent Mineral Buildup
Wiping down your shower head after each use goes a long way toward slowing mineral buildup. A quick pass with a towel removes water droplets before they have a chance to dry and leave mineral traces behind. It takes only a few seconds and can add weeks between deep cleanings.
Installing a water softener is another option worth considering if you live somewhere with especially hard water. While it’s a bigger investment upfront, it reduces mineral buildup throughout your entire plumbing system, not just your shower head. Some homeowners also switch to a shower head with a self-cleaning rubber nozzle design, since the flexible material makes it easier to rub away deposits by hand.
Cleaning the tile and glass around your shower head also helps, since soap scum nearby can spread back onto the fixture over time. Keeping the whole shower area dry and free of residue means less work for you down the road.
Cleaning your shower head regularly is a small task that makes a real difference in your daily shower. With just a bag of vinegar and a bit of patience, you can restore strong water pressure and keep your bathroom fixtures looking their best for years to come.